Final Cut Pro vs iMovie: Which is Better for Video Editing
Apple’s iMovie and Final Cut Pro are two of the most recognizable pieces of post-production software ever made and it’s not very hard to see why. Final Cut Pro was introduced in 1998 by a few of the team members that worked on Premiere Pro. iMovie has it’s roots all the way back to 1999 as a quick and easy way to edit videos if you were a mac user looking for a user-friendly video editing software.
Both video editing tools are some of the best in their class, offering a slew of options for both beginners and even professionals. The age-old question remains though...which one is better?
Well, this answer entirely depends on your workflow as an editor as well as what type of content you’re creating. This tutorial will go over iMovie vs Final Cut Pro to decide which one is best for your beginner and professional video needs.
Note: With Simon Says, you can leverage AI to automatically transcribe and caption your content directly in Final Cut Pro. The extension supports 100 languages and can significantly cut down the amount of time it takes to work with text.
What is Final Cut Pro?
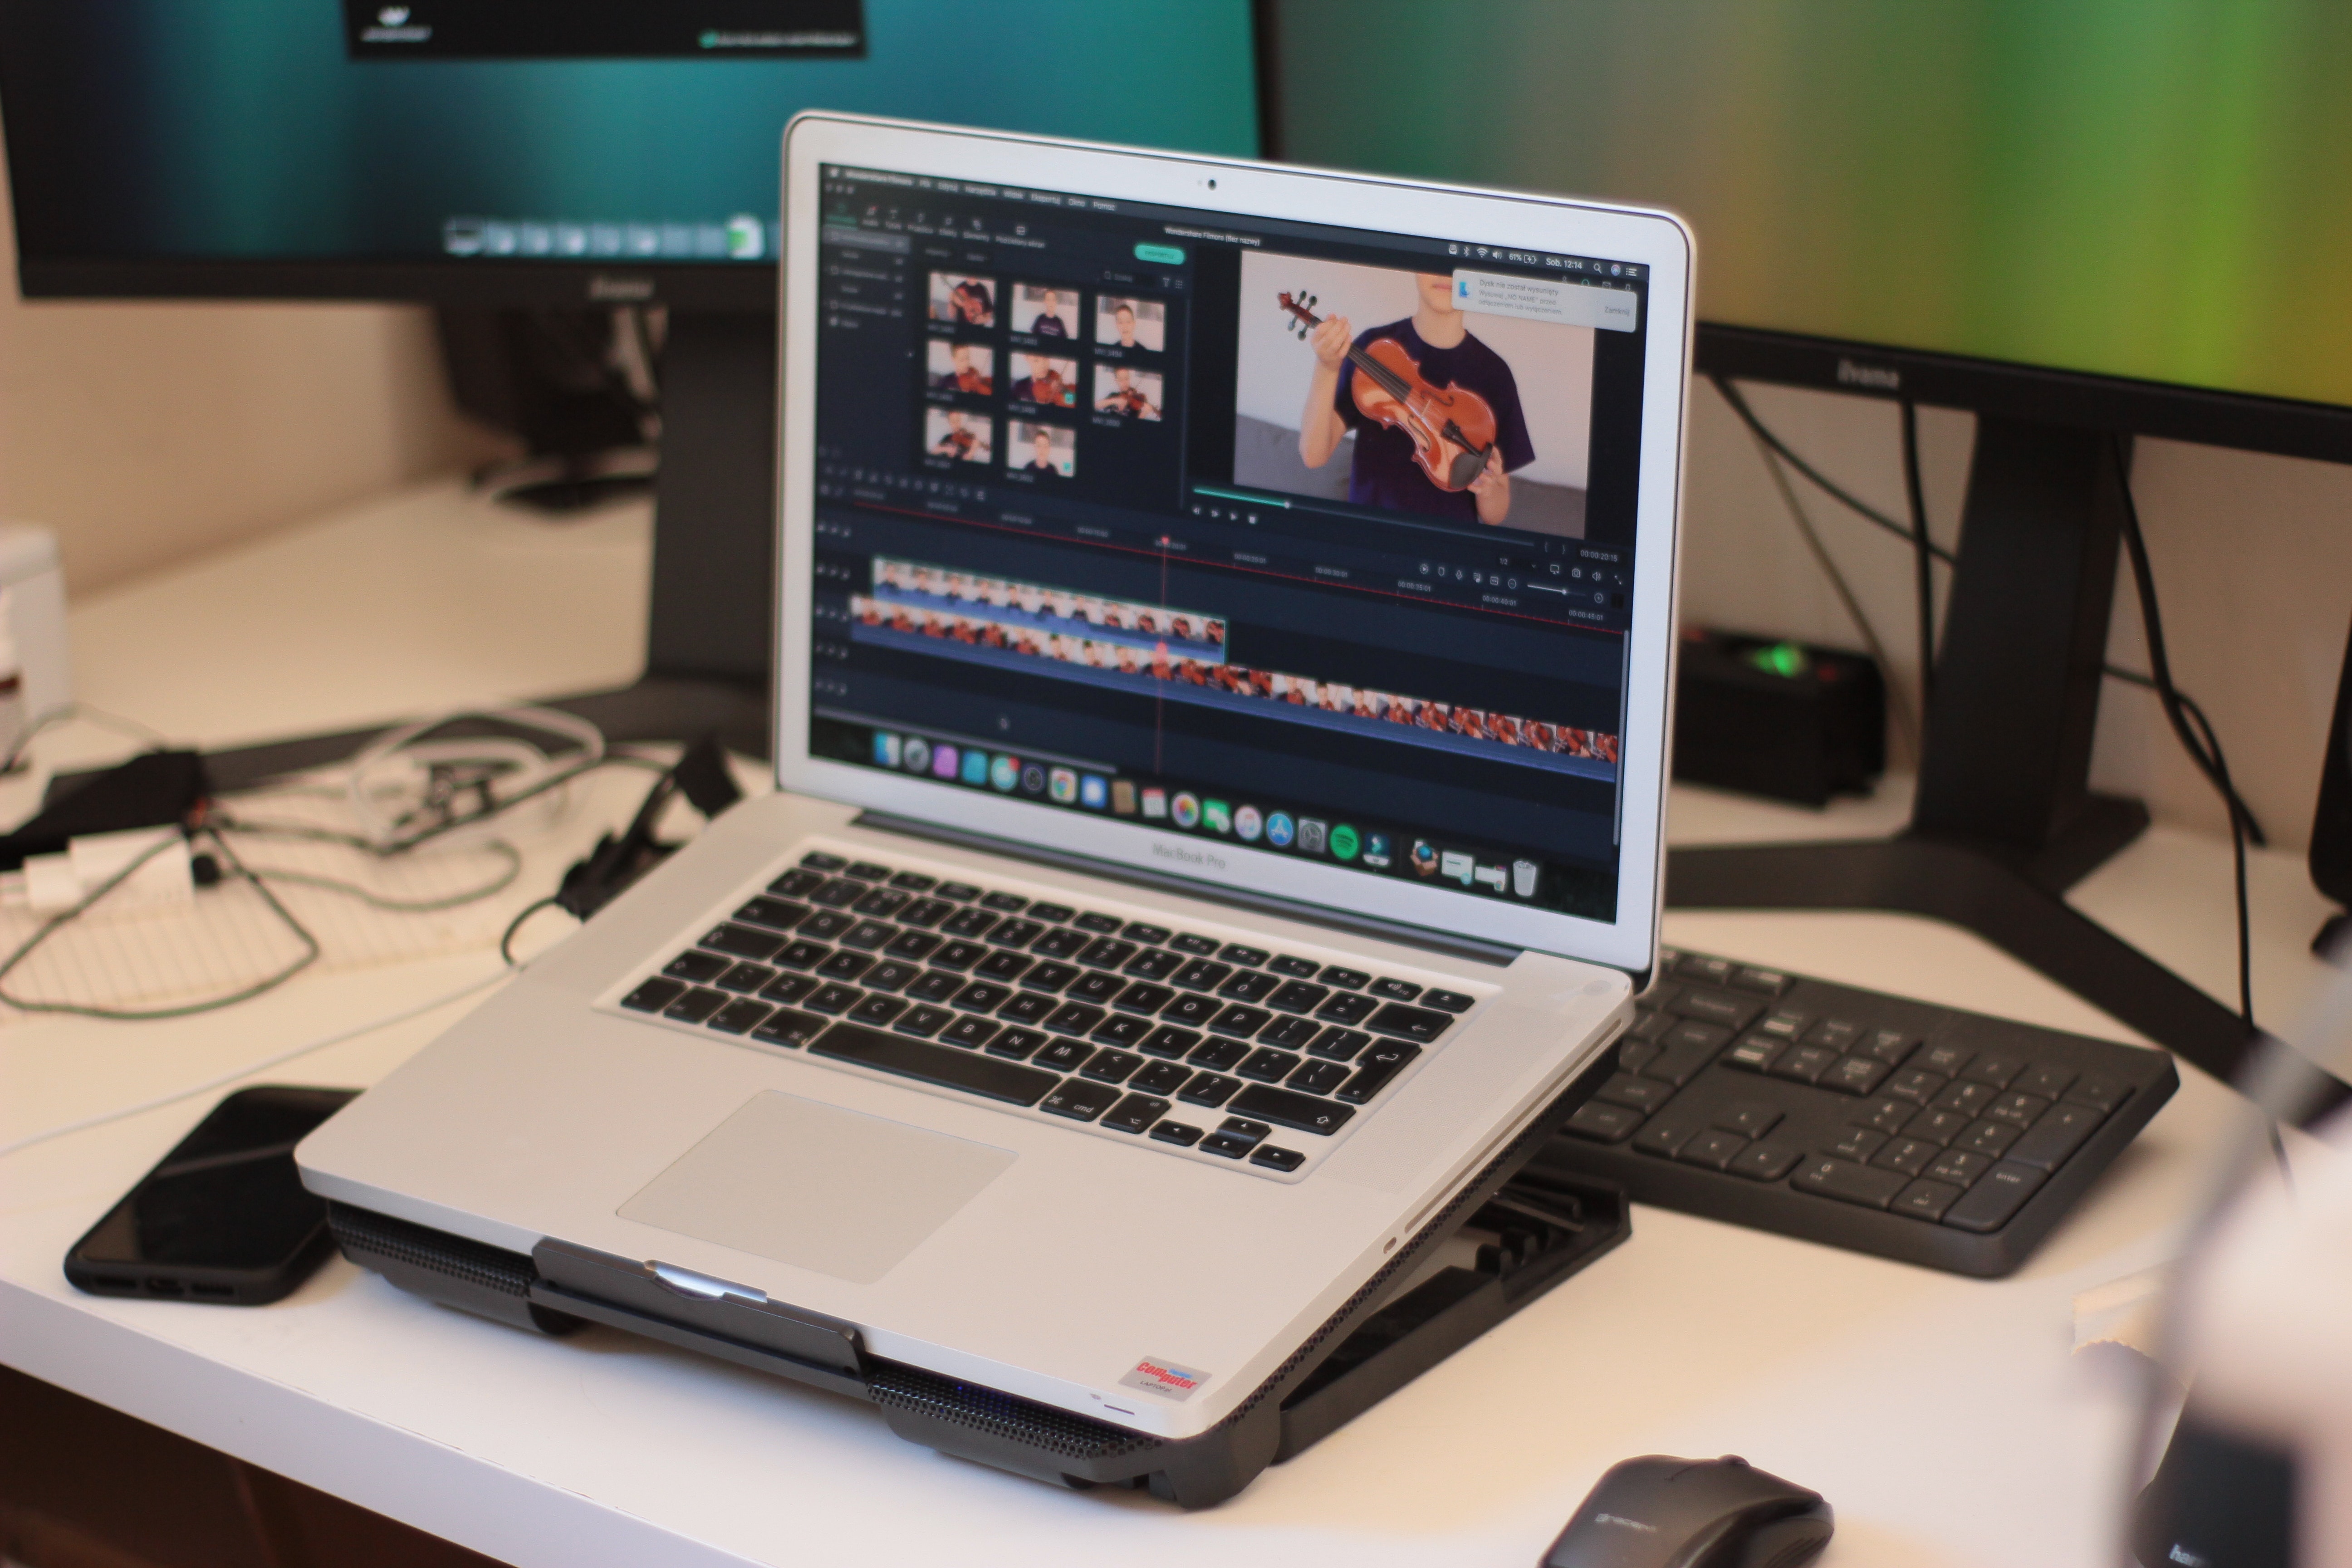
Final Cut Pro is an NLE made by Apple and available exclusively for macOS devices. Apple’s FCP has had a long history in film history and video production. Since its conception, it has been the quintessential editing software for both post-production professionals and amateurs alike.
While Final Cut Pro X’s intro (now simply called Final Cut Pro) had a rocky startup that left many old software users disgruntled, it still continues to be a pillar of the editing industry besides programs such as DaVinci Resolve and Adobe Premiere Pro.
With a clean interface and snappy design, Final Cut is a video editor’s dream.
What is iMovie?
iMovie is a mobile video editing made by Apple and available exclusively for ios and macOS devices (such as MacBook, iPad, and iPhone). iMovie is another great free tool for editing iPhone videos. It is a lot more robust than the default editing software in the photos app and gives you much more editing features. The best part about iMovie is that it’s completely free with zero in-app purchases.
Final Cut Pro vs iMovie: Pricing
Final Cut Pro and iMovie offer wildly different pricing schemes. Final Cut Pro is a flat fee of $299.99 and is available directly on Apple’s app store. All updates after buying this software are entirely free as well.
iMovie is great because it comes totally free with all Apple devices. This piece of video editing app is downloaded automatically on devices such as iPhone, iPad, and Mac.
Final Cut Pro vs iMovie: Ease of Use
The interface of Final Cut is much different than what you’ll find on similar NLEs. Final Cut Pro has a “user experience first” sort of design philosophy, offering an incredibly intuitive and clean-looking workspace. There’s one thing, in particular, that may seem off-putting to some people.
Final Cut Pro uses a magnetic timeline, meaning that the timeline “magnetically” adjusts depending on where you move your clips. This was a feature introduced in Final Cut Pro X (back in 2011) and an incredibly divisive one at that.
A lot of professional video editors couldn’t stand the magnetic timeline when it was first introduced, claiming that FCPX looked and felt too much like iMovie. In practice though, the magnetic timeline can actually save quite a bit of time once it’s mastered.
Speaking of iMovie, this video editing program is incredibly easy to use. iMovie has a similar magnetic timeline to Final Cut Pro as well as a “user first” touch interface.
Final Cut Pro vs iMovie: Interface
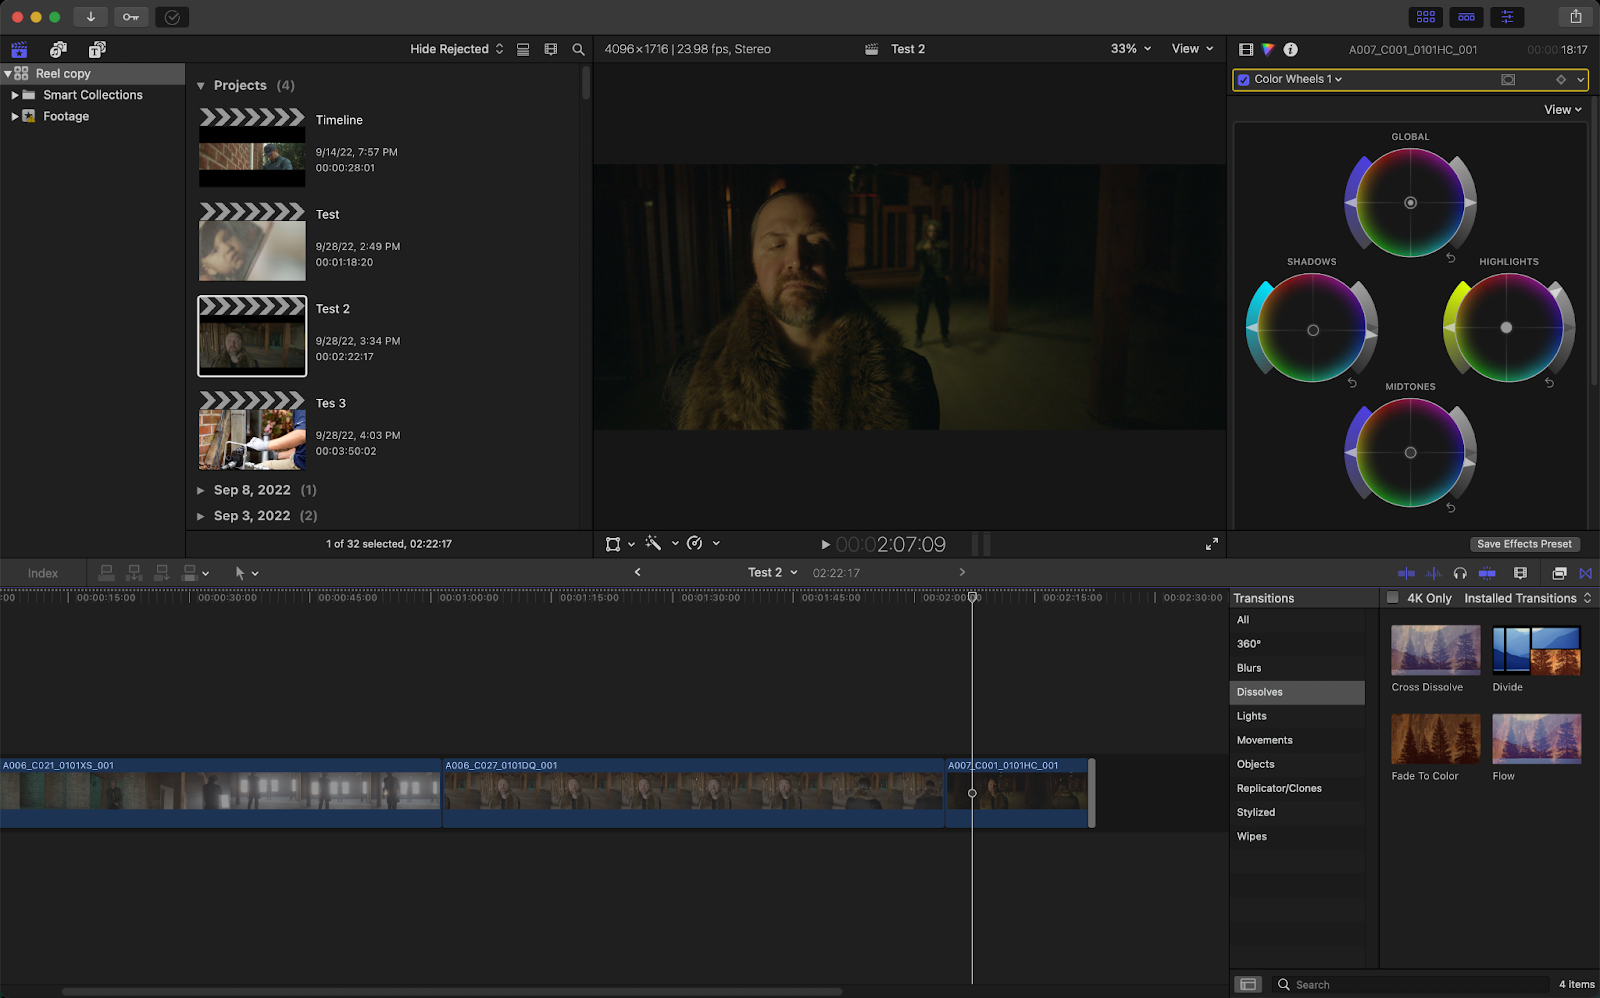
There are four main areas to Final Cut. On the left side of the screen is where you’ll find all of your media and text (by default it’s set to the Libraries Sidebar). You’ll be able to import audio and video from this side of the screen as well as create text.
The middle is your viewer where you’ll be able to playback your video. You can also access some of your timeline tools at the bottom of your viewer along with your audio levels.
On the right side of the screen are four functionalities (the Inspector Sidebar). You’re able to edit your clip, color your clip, edit your sound, and view your clip information from here.
Finally, at the bottom of the screen is the magnetic timeline. From this timeline, you’ll also be able to access your video and audio effects as well as your transitions.
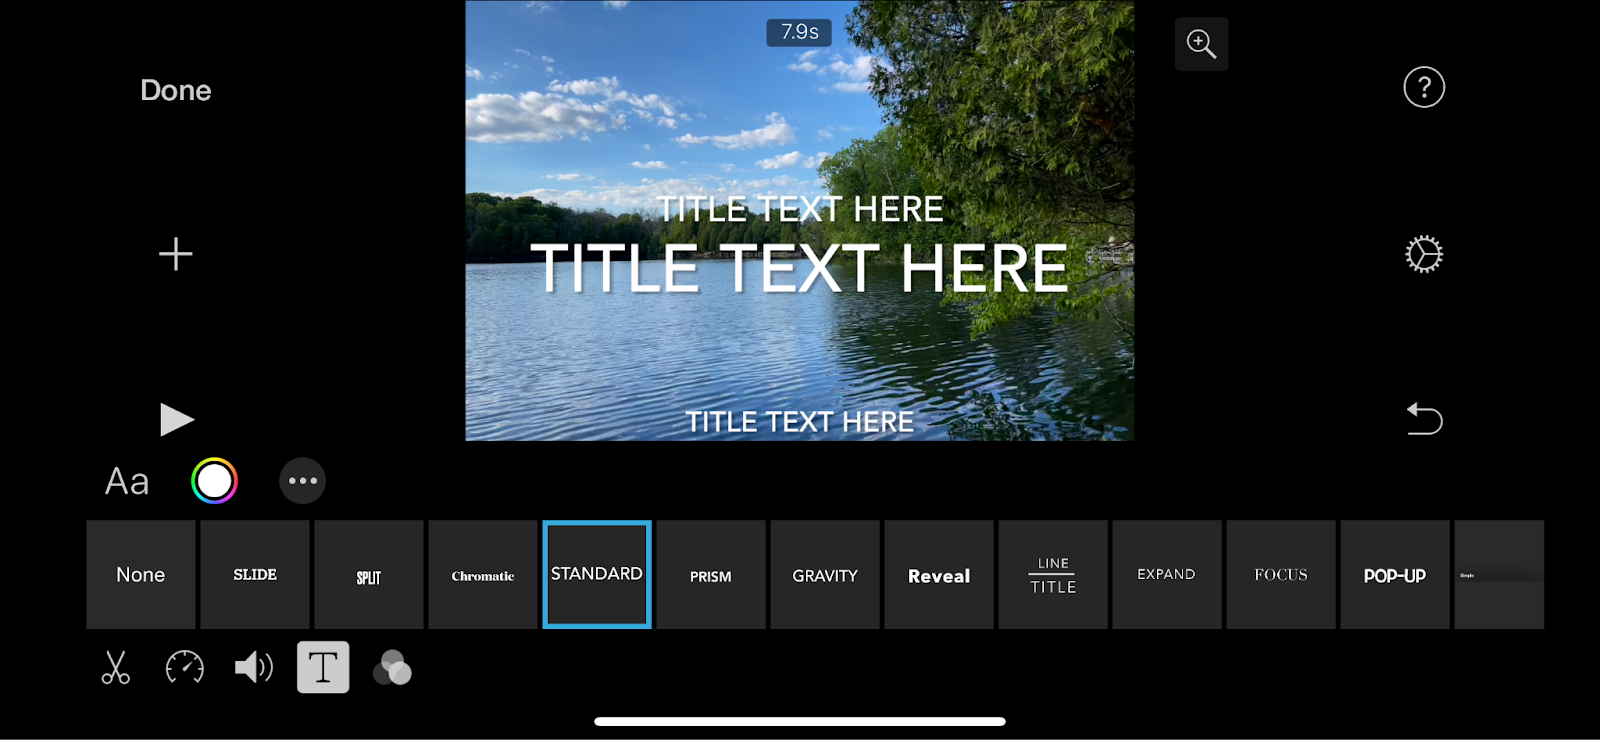
Opening up iMovie will give you three different starting options:
- Magic Movie creates an automated “movie” based on what media you give it.
- Storyboard allows you to create trailers and short video clips based on a series of templates iMovie gives you.
- Movie allows you to create a “movie” from scratch and is a lot more in line with more traditional software you may find.
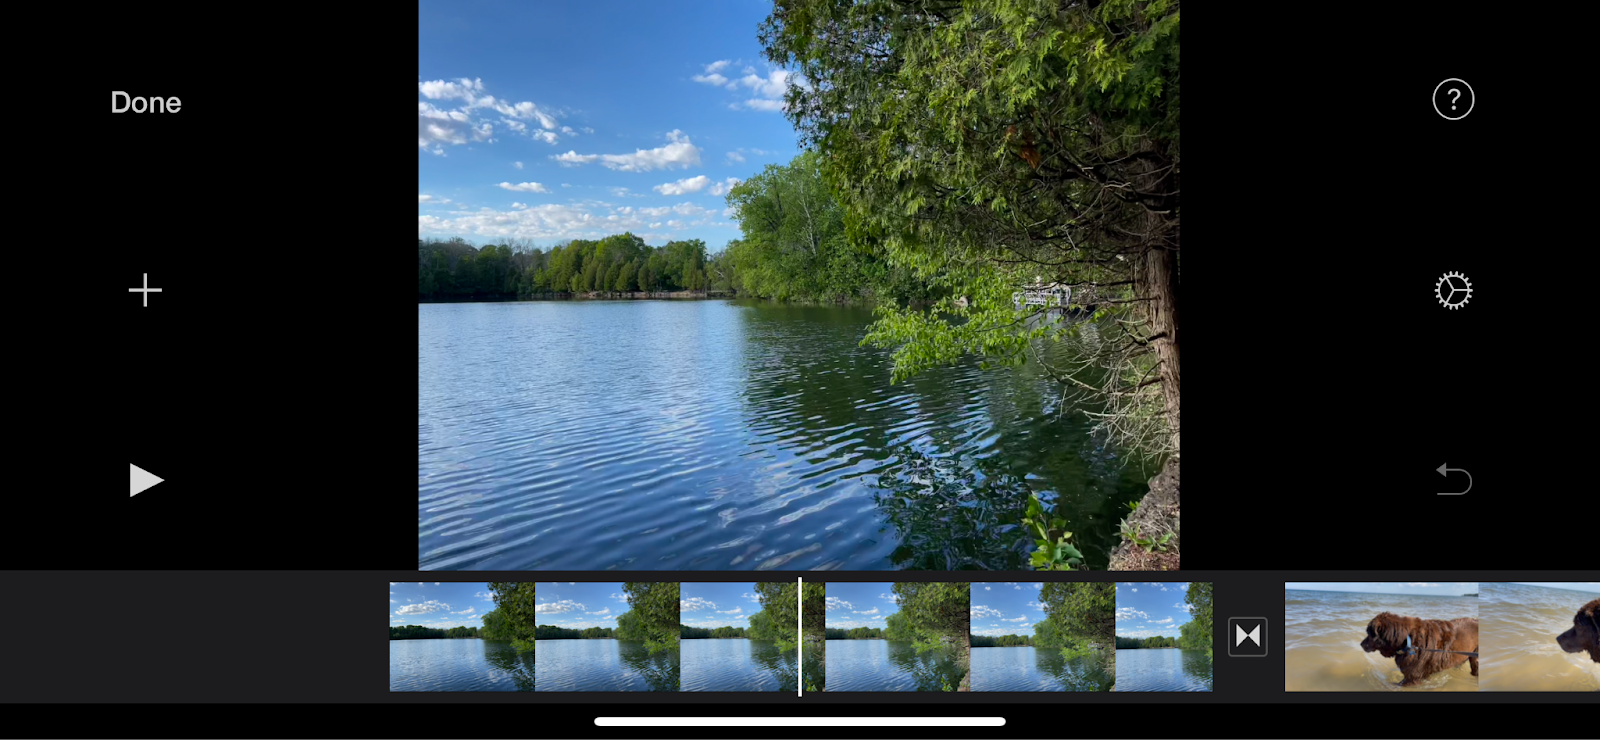
After selecting them, you’ll be brought to a timeline where all of your clips are automatically inserted. iMovie has an incredibly intuitive interface. On the left hand of the screen are options for finishing your movie (Done button), adding more media (Plus button), and playing your movie (Play button). On the left-hand side are options for help (Question mark button), project settings (Gear button), and an undo button.
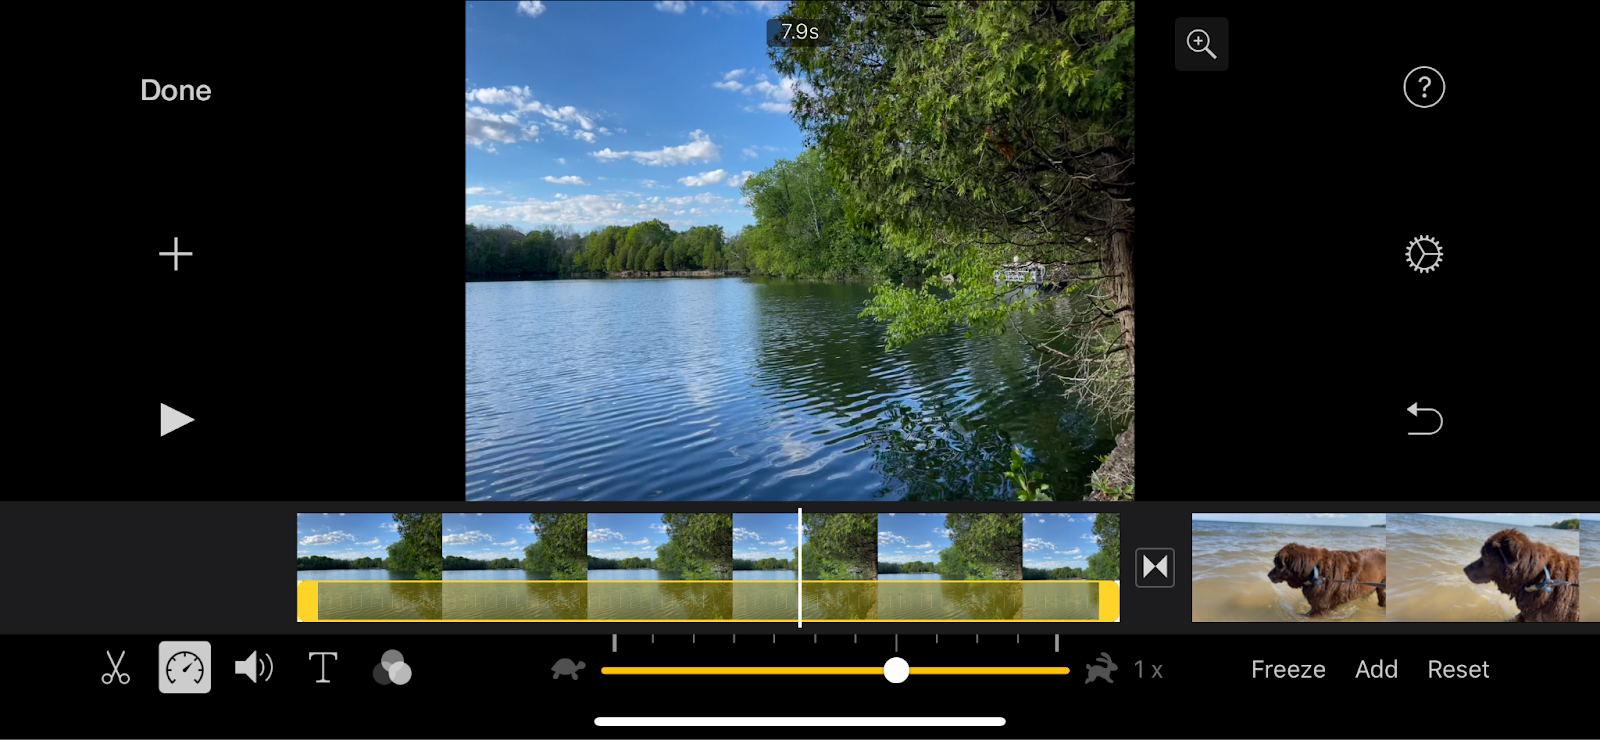
Clicking on any of the video clips in the timeline will bring up a small menu at the bottom of the screen. The Scissors icon (default) will let you change the starting and end points of the clip by pulling the bolded yellow on either end.
The Timer icon allows you to change the speed of the clip and also lets you freeze certain frames within the clip itself.
The Audio icon allows you to change the volume of the audio of the video (assuming your video has any audio at all). The text icon lets you add text overlays to your clip and gives a wide variety of presets to choose from. You can also change the font, duration, and color of the text as well.
Final Cut Pro vs iMovie: Color Correction
The Color Inspector in Final Cut Pro is where you’ll find all of your color grading and color correction tools. You can also go to Window > Workspaces > Color and Effects to view all of your color settings.
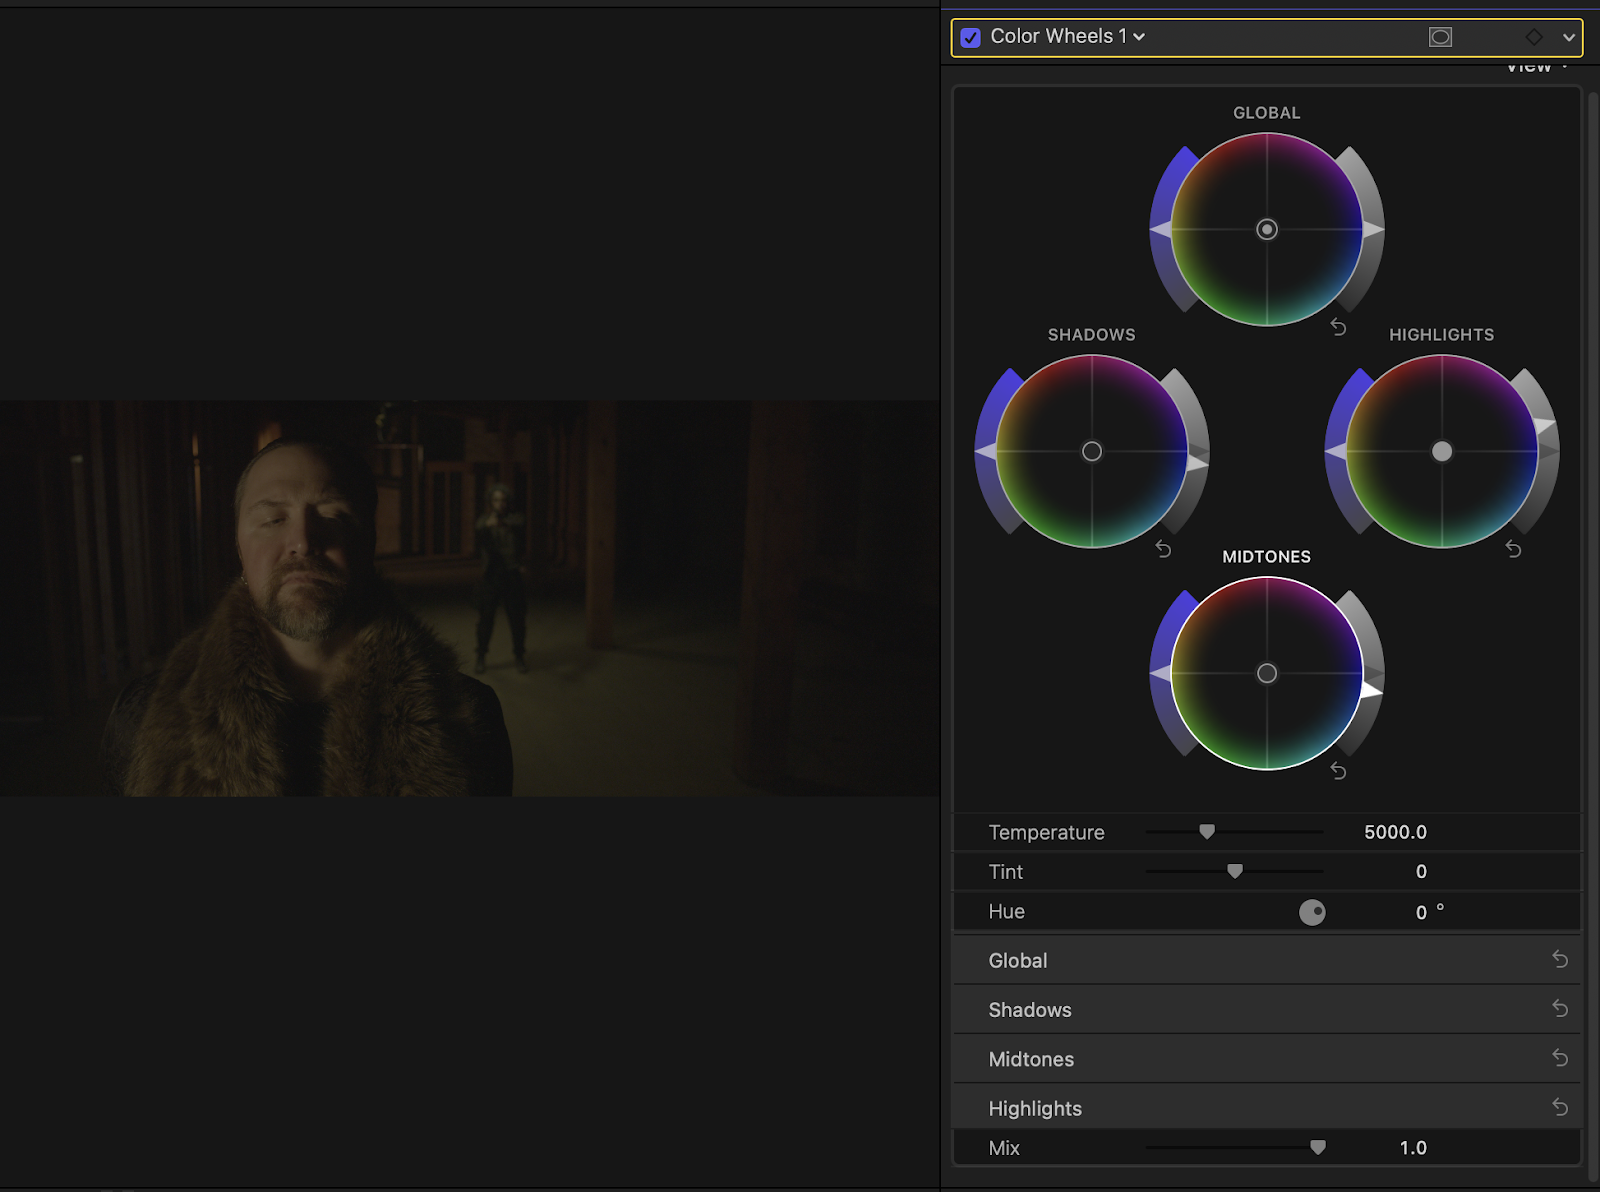
The Color Inspector is located on the right-hand side of the screen and contains a few different submenus (Color Board, Color Wheels, Color Curves, and Hue/Saturation Curves).
Color Wheels
Color Wheels are one of the most universal ways to color your image. The Highlight Wheel adjusts the intensity of your highlights, the Shadow Wheel will adjust the intensity of your shadows, and the Midtone Wheel will adjust the intensity of your mid-tones (which is pretty much everything in between your highlights and shadows).
There are also options for temperature, tint, and hue in the color wheel panel. You can also adjust the color, saturation, and brightness of your footage from here.
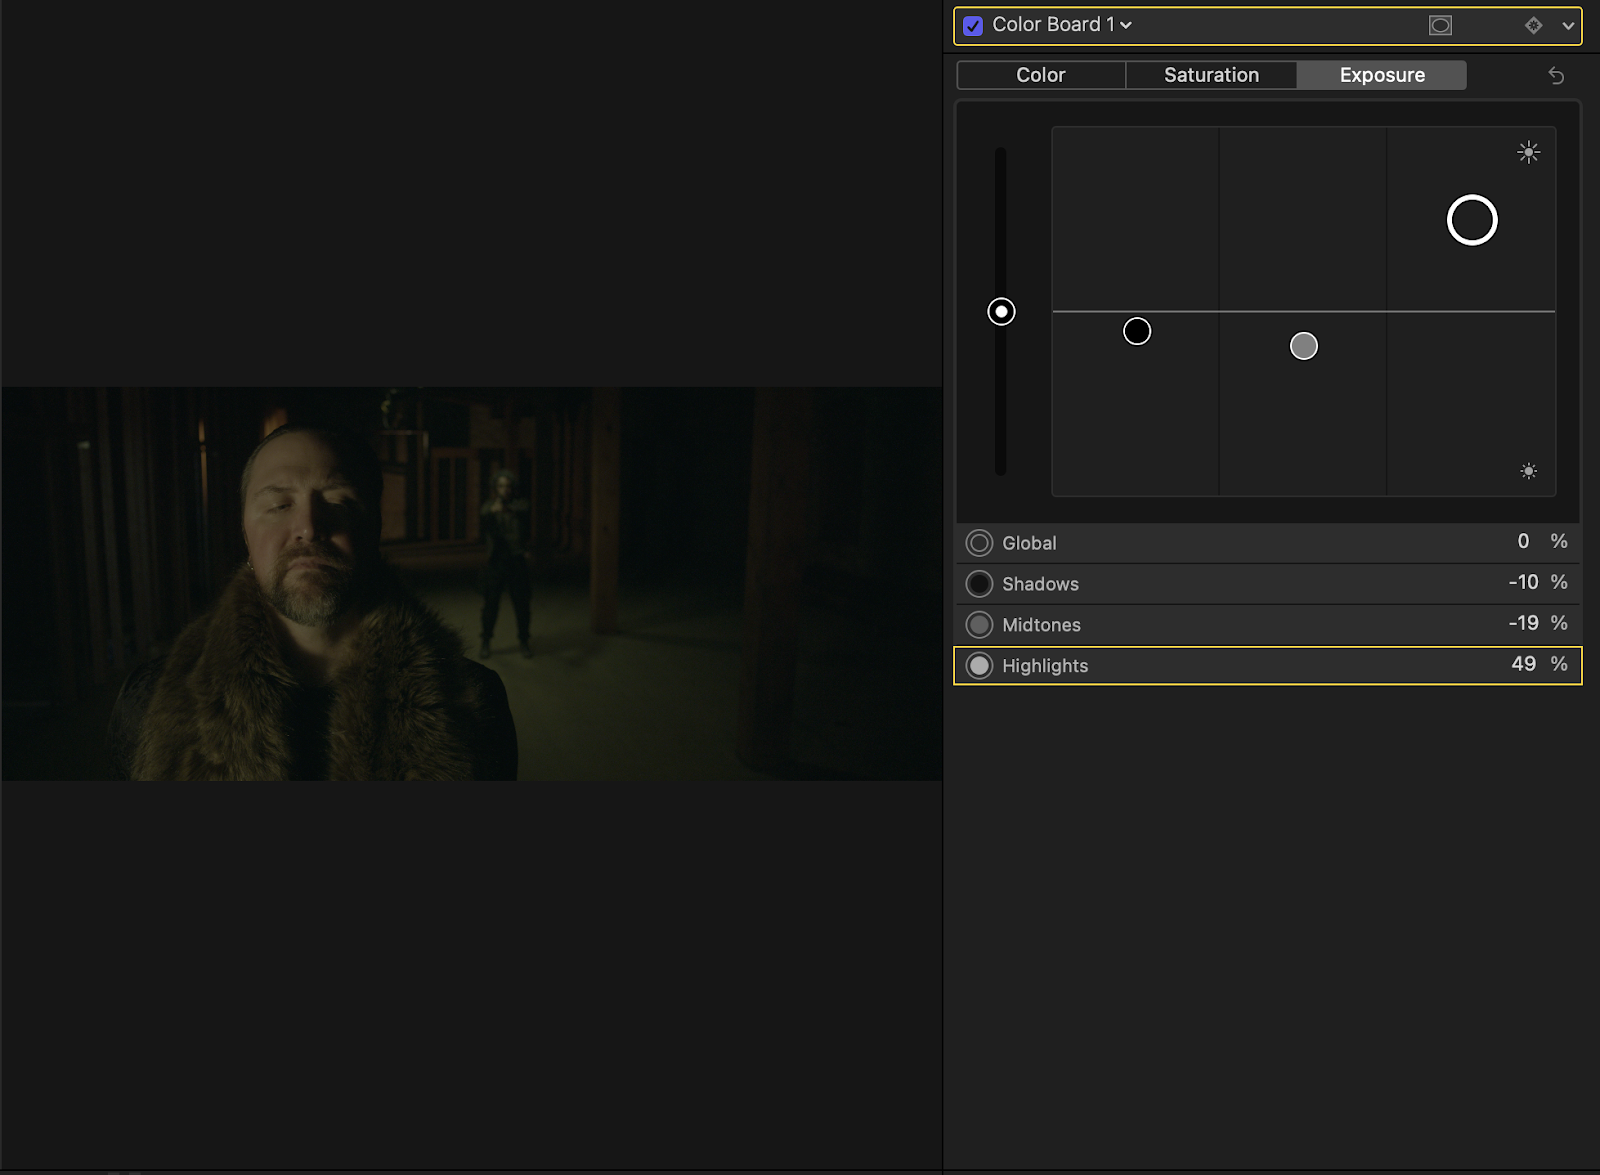
Color Board
The color board lets you change the color, saturation, and exposure of your clip’s highlights, mid-tones, and shadows. The color board is pretty unique to Final Cut and is adjusted by moving around a series of circles on a board at the top of the screen.
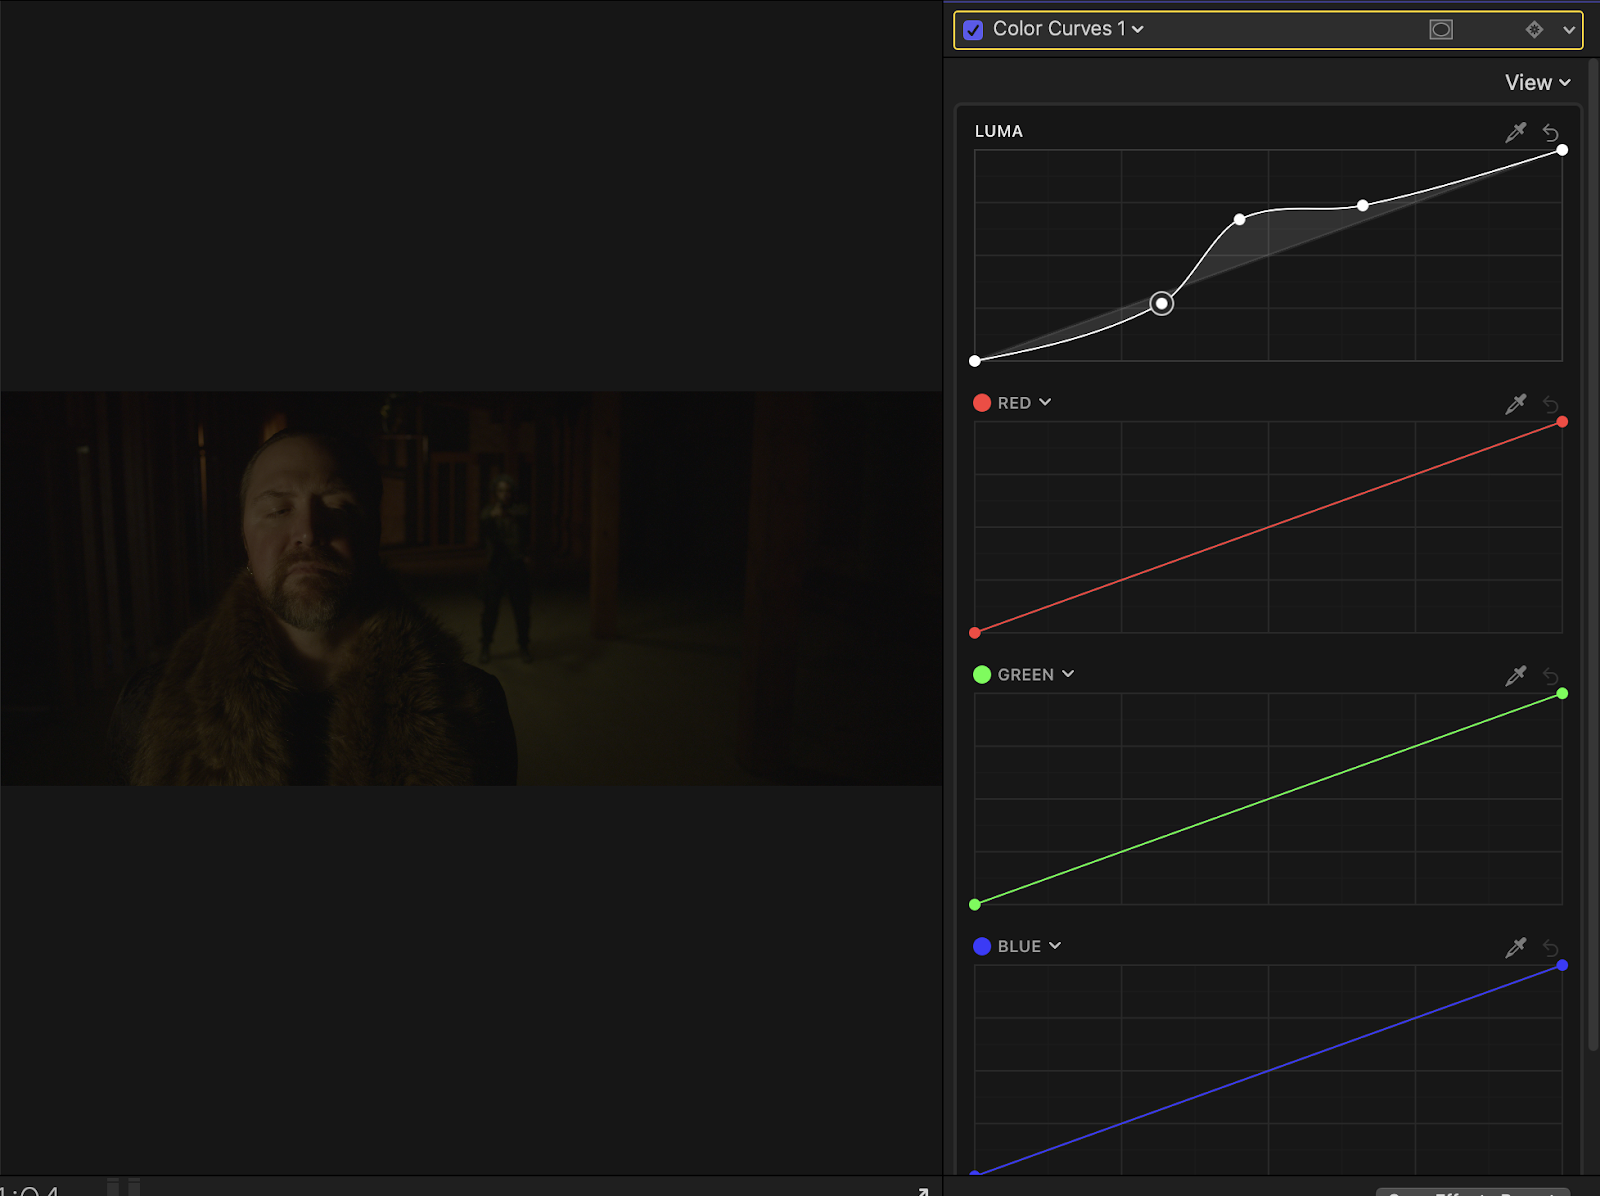
Color Curves
Curves give you much more control over a lot of the features covered under Wheels and Board. For example, the RGB Curve is used to adjust the contrast of your image. A simple “S curve” will boost the highlights and darken the shadows. You can create a curve by clicking on the line in the middle of the color graph.
A dot will form that you can drag around. Selecting a dot and clicking delete on your keyboard will reset everything back to normal.
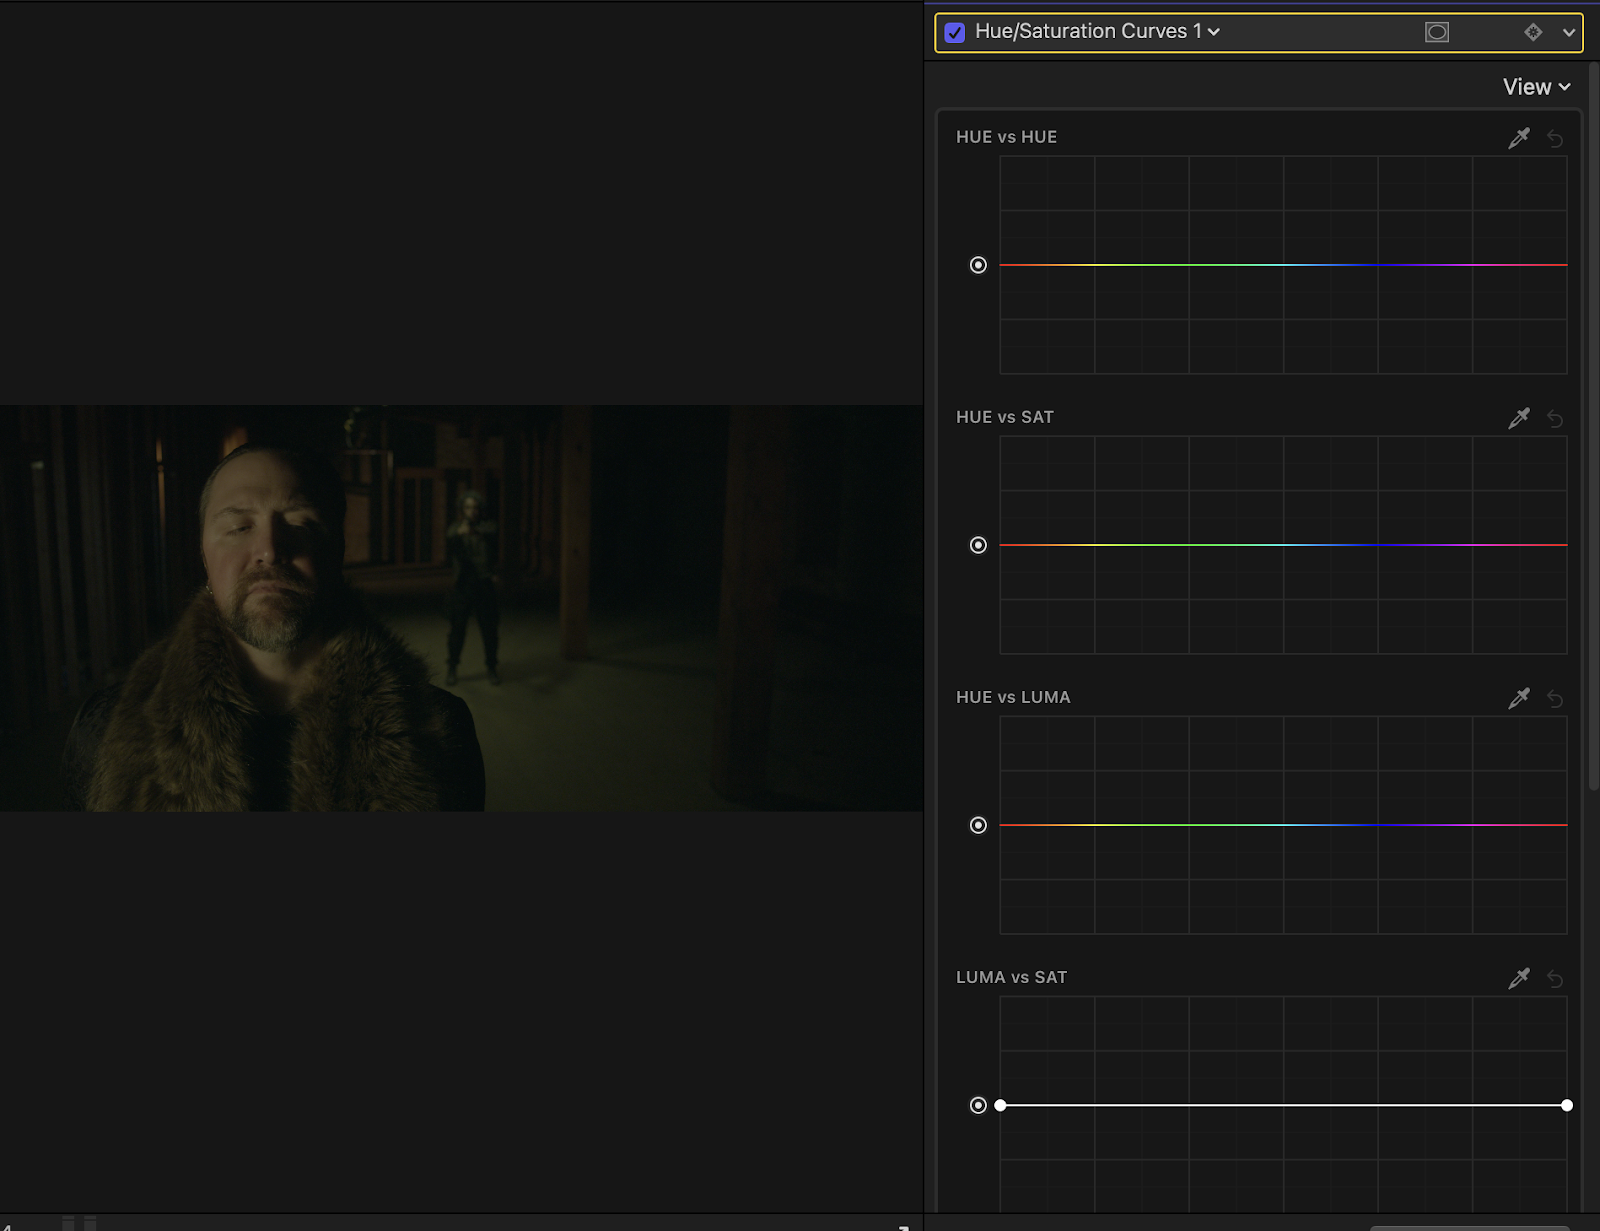
Hue/Saturation Curves
The Hue/Saturation Curves give you control over the saturation and hue of your image by using a graph.
- Hue vs Hue: What this does is allows you to select a certain color and change it to another color. This is super handy for stylistic content (such as music videos or social media clips).
- Hue vs Sat: This isolates a particular color range and allows for it to be more or less intense.
- Hue vs Luma: This will change the brightness of certain areas depending on the range that you choose.
- Luma vs Sat: What this curve does is let you change the brightness of a spot based on the saturation.
Sat vs Sat: This changes the saturation of certain colors of the image which can be incredibly handy if a background color is too prominent or not prominent enough.
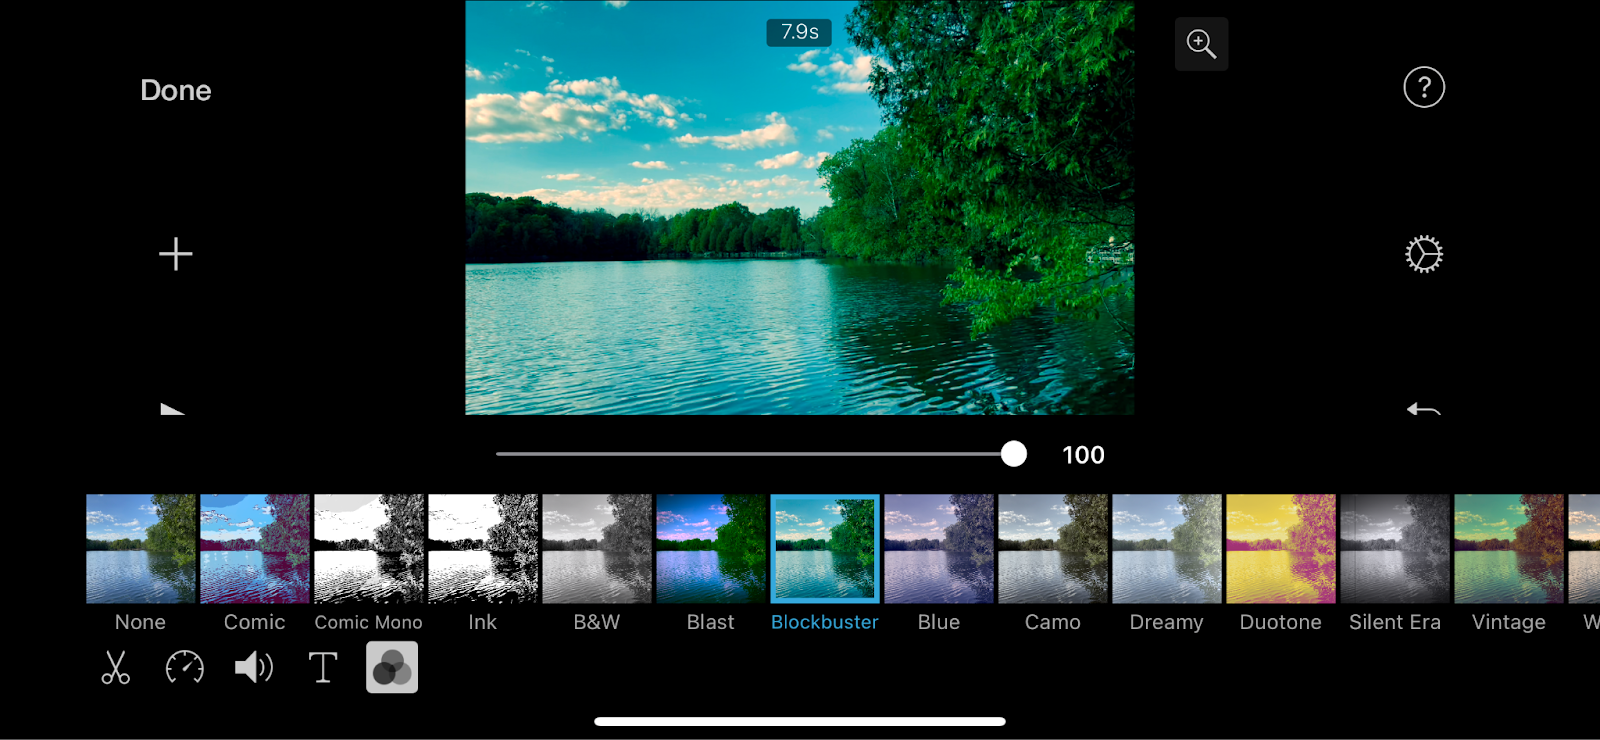
iMovie meanwhile has little to no color correcting and color grading options. The Color icon lets you add filters to your video clip, allowing you to adjust the intensity of said filter as well. An important thing to note is that iMovie doesn’t have standard coloring tools that you may find in other video editing apps, including the default photos app. A lot of the more advanced features covered in Final Cut Pro can only be found there.
Final Cut Pro vs iMovie: Features
Final Cut Pro is wonderful for smaller projects or projects with only one team member. Final Cut is great for those who upload a lot to social media as well. Its lightning-fast and minimalist interface makes Final Cut Pro great for content creators who frequently upload to platforms such as YouTube. Final Cut Pro is also excellent for those who are in the Apple ecosystem. Creators who only use iPads, iPhones, and Macs will be able to take full advantage of Final Cut’s optimization.
Creators uploading to social media, now more than ever, are the ones who greatly benefit from high-end transcription. Final Cut Pro allows for all sorts of plugins, including the wonderful Simon Says transcription extension.
Most audiences watch all social media content with no volume whatsoever, making captions and subtitles absolutely crucial. Simon Says makes this process easier than ever with their plug-in, built directly for Final Cut Pro.
While iMovie may have a lot of similarities to Final Cut Pro, it misses out on a lot of key features like advanced keyframes, scopes, and third-party plugins. iMovie is great for those who shoot a lot of video on their iPhones and want to dip their toes into video editing.
Alternative video editing tools
Even though iMovie and Final Cut Pro are incredible pieces of video editing software, there are plenty of other beginner and professional video editing software out there. Programs like Adobe Premiere Pro and DaVinci Resolve are wonderful for more advanced editing techniques and are perfect for high-quality videos.
The best video editor is the one that chooses the software that best fits their needs. When it comes to video editing, it’s best to choose software that speeds your process up as intuitively as possible.
Too fast doesn’t exist in the editing world though, and editors are always looking for ways to speed up their process. More of the mundane and tedious things such as subtitles can be gotten out of the way with 3rd party extensions and templates.
With Simon Says you can swiftly add captions to your videos in Final Cut Pro without having to rely on the platform's slow, manual built-in functions.